In part 2 we hosted the blog in a Azure Static Web app and used a GitHub action to automatically build and deploy the Hugo site when new markdown files are committed.
In this post we look at how to add usage analytics to our blog. Analytics are useful to know if the site is working, the number of visitors and the number of page views. In the age of tracking protection, this has its challenges. There are several good analytics options available. Let’s take a look at some options.
Google Analytics
- The stalwart of analytics
- Just two lines need in Hugo config
- Offers free product as well as paid
- Gathers detailed user information and behaviour
Fathom
- Privacy focused
- 7-day free trial, subscription model
- Doesn’t require cookie notices
- Bypasses ad trackers through an additional DNS record
- EU traffic routed through EU
Plausible
- Cookie-less approach
- Made and hosted in the EU
- Privacy focused
- Open source
- 30-day trial subscription model
- Self-hosting option
Open web analytics
- Open source
- Extensible and easy to customise
- Self-hosted only
- Cookie based approach
Azure Application Insights
- Focus on usage and performance
- No personal data collected
- Cookie based approach (but can be disabled)
- Pay as you go
Let’s talk privacy
There’s a growing awareness of privacy. Users are getting wise to trackers, creepily targeted ads, and the increasing accuracy of user profiling - especially from the tech titans such as Google, Meta, and other social media platforms. As the saying goes: if the platform is free to use, then you are the product. Not only do we have a responsibility for our own privacy, but if we build a service, even a blog, we also have a responsibility to our visitors. It’s time to take responsibility with the data we gather and use. The Spread Privacy initiative, authored by DuckDuck go, is a great place to get an education.
Choices, choices
There’s no denying that the simplest thing to do would be to use the free tier of Google Analytics – it’s a two-line change in Hugo’s config.yml to add the tracking ID, but as a privacy advocate, I want to do better. Fathom and Plausible offer privacy-focused services, and while not too expensive, it’s a little more than I want to commit to at this stage. If the blog grows and I want to get a little more detail that will help me fine tune my SEO, then I will make the financial commitment. But given this is early days for the blog, and it’s a service I’ve used before in my day job, I will start off with Azure Application Insights and see where that takes me. App Insights has the most basic features I need; user counts, page views and is ticks enough of the privacy boxes. Right now, I’m more interested to know if the blog is working than how to drive more traffic to it. I need to keep an eye on the volume of traffic because App Insights can become a little expensive if the traffic grows suddenly. There are ingestion caps, alerts and other spending controls.
https://docs.microsoft.com/en-us/azure/azure-monitor/app/pricing#managing-your-data-volume
Hooking into Hugo
Now the analytics tool has been chosen, how do we hook it up to Hugo? The PaperMod theme has hooks for customisation for header, footer and CSS.
We’re going to want to add in some custom code to initialise App Insights and that’s going to need to live in the header.
.(site root)
├── config.yml
├── content/
├── theme/hugo-PaperMod/
└── layouts
    ├── partials
    │   ├── comments.html
    │   ├── extend_footer.html
    │   └── extend_head.html
    └── robots.txt
If we create a file called extend_head-html in the site root under the layouts/partials file path. this HTML file will get bumdled as part of the head and can include HTML, JavaScript, or CSS.
But before we go ahead and initialise App Insights, there’s some privacy laws to attend to. The General Data Protection Regulation (GDPR) stipulates that we need to ask for user consent before cookies can be leveraged to analyse user behaviour.
We’re all familiar with cookie banners we see everyday, and that’s what we need to build to comply with the regulation. LittleBigTech has an excellent blog article on how to go about this. I’ll base the banner off his work, but with a few twists. I want to keep the PaperMod theme directory unmodified and easy to update via git submodules, so I’ll use the the PaperMod hooks mentioned above.
Let’s start with the head modifications
Here’s what will go into extend_head.html
<div id="cookie-notice">
    <span>We would like to use third party cookies and scripts to improve the
        functionality of this website.</span>
    <a id="cookie-notice-accept" class="button">Accept</a>
    <a id="cookie-notice-deny" class="button">No Thanks</a>
    <a href="/privacy">More info</a>
</div>

<script>
    function createCookie(name, value, days) {
        var expires = "";
        if (days) {
            var date = new Date();
            date.setTime(date.getTime() + (days * 24 * 60 * 60 * 1000));
            expires = "; expires=" + date.toUTCString();
        }
        document.cookie = name + "=" + value + expires + "; path=/";
    }
    function cookieExists(name) {
        return document.cookie.split(';').some((item) => item.trim().startsWith(name)) ? true : false;
    }

    function readCookie(name) {
        if (cookieExists(name)) {
            return document.cookie.split('; ').find(row => row.startsWith(name)).split('=')[1];
        }
        return null;
    }

    function eraseCookie(name) {
        createCookie(name, "", -1);
    }

    if (readCookie('cookie-notice-option') == 'true') {
      // ... intialise App Insights

    } else if (readCookie('cookie-notice-option') == null) {
        document.getElementById('cookie-notice').style.display = 'block';
    }

    document.getElementById('cookie-notice-accept').addEventListener("click", function () {
        createCookie('cookie-notice-option', 'true', 31);
        document.getElementById('cookie-notice').style.display = 'none';
        location.reload();
    });

    document.getElementById('cookie-notice-deny').addEventListener("click", function () {
        createCookie('cookie-notice-option', 'false', 31);
        document.getElementById('cookie-notice').style.display = 'none';
        location.reload();
    });

</script>
And for the custom CSS, we’ll create a file called cookie-banner.css in the /assets/css/extended path from our site root.
.(site root)
├── config.yml
├── content/
├── theme/hugo-PaperMod/
└── assets/
    └── css/
        └── extended/
            ├── cookie-notice.css
This CSS will style the cookie banner:
#cookie-notice {
    padding: 0.5rem 1rem;
    display: none;
    text-align: center;
    position: fixed;
    bottom: 0;
    left: 20px;
    padding-top: 40px;
    padding-bottom: 40px;
    width: 100%;
    background: rgb(82, 75, 180);
    color: rgba(255,255,255,0.8);
    z-index: 1;
}

#cookie-notice a {font-weight: 600; display: inline-flex; cursor: pointer; margin-left: 0.5rem;}
#cookie-notice-accept {color:rgb(7, 7, 7)}
#cookie-notice-deny {color:rgb(143, 140, 140)}

@media (max-width: 767px) {
    #cookie-notice span {display: block; padding-top: 3px; margin-bottom: 1rem;}
    #cookie-notice a {position: relative; bottom: 4px;}
    #cookie-notice {left: 0px;}
}
And here’s the banner in action.

Creating App Insights
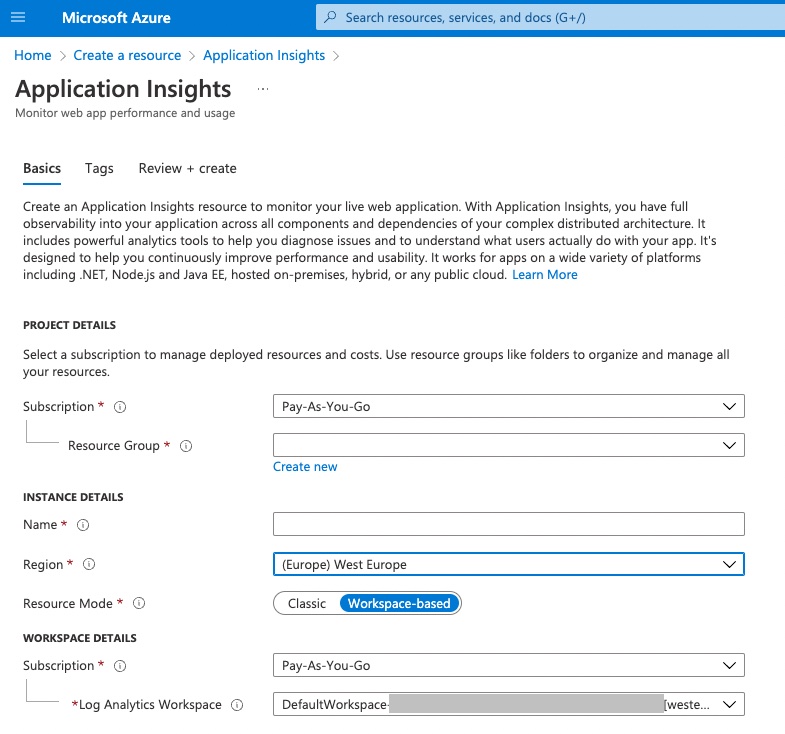
An instance of App Instance can be created in the Azure portal using the Create a resource button and then searching for App Insights.
Next we just need to complete resource group, name, and region
Configuring App Insights
Now we have the App Insights instance created, we need to fetch the App Insights JavaScript library within extend_head.html :
<script src = "https://js.monitor.azure.com/scripts/b/ai.2.min.js"><script>
If users have tracking protection enabled, this script will be get blocked by some browsers (e.g. Brave).
Assuming the cookie has been accepted, we can initialise App Insights like this:
  var snippet = {
            config: {
                instrumentationKey: "#{APP_INSIGHTS_KEY_PLACEHOLDER}#"
            }
        };
        var init = new Microsoft.ApplicationInsights.ApplicationInsights(snippet);
        var appInsights = init.loadAppInsights();
        appInsights.trackPageView();
AppInsights needs a ‘secret’ key as part of the configuration, and this is what we’ll talk about next.
Can you keep a secret?
App Insights requires an instrumentation key, a unique identifier for the App Insights instance. Ideally we don’t want to embed that in the source code in a public repository! Having access to the key doesn’t mean an attacker could fetch data from the App Insights instance (there are Role Based Access Controls around that), but it does mean an attacker could send data to an App Insights instance as part of a denial of service attack. A determined attacker will be able to find the key by using the browser inspection tools, but there are ways to protect against this which I’ll talk about in future post.
You can find the key in the Azure portal in your App Insights instance:

We’ll put a #{APP_INSIGHTS_KEY_PLACEHOLDER}# placeholder in the source code and then use a GitHub action to swap that with the real key held in the repository secrets. You can get to the repository secret settings UI from the repository/Settings/Secrets/Actions menus.
To replace the App Insights token placeholder, we add this to the .github/workflows/blog-build-deploy.yml action.
 - name: Insert App Insights  instrument key
        run: find . -name 'extend_head.html' -exec sed -i ''s/#{APP_INSIGHTS_KEY_PLACEHOLDER}#/${{ secrets.APP_INSIGHTS_KEY }}/g'' {} \;
The last thing we need to do is to define a Privacy page, where we can provide more detail and link to that from the cookie banner and the main menu.
Something like:
“We collect usage data using Azure Application Insights for the purposes of visualising the traffic on this website. All data is anonymised and we do not sell or share any data with third parties. If you choose not to accept, no analytics data will be processed.”
The completed version of extend_head.html can be found here.
Summary
In this post we’ve explored the different analytics options available and implemented Azure Application Insights. A future analytics enhancement would be to work around any browser tracking protection while still respecting visitors' choices around analytics tracking.
In this 3-part series, we’ve created a Hugo blog in part 1, set up the hosting and deployment in part 2, and in part 3, enabled some basic analytics.